With its emphasis on light tones and minimized shadows, high-key photography is a fantastic way to infuse your nature photos with a vibrant, ethereal quality.
Whether you're a seasoned photographer or a novice behind the lens, this guide will help you master the art of high-key photography and bring a fresh perspective to your outdoor shots.
What is high-key photography?
High-key photography aims to limit the lighting ratio in a shot, resulting in images characterized by an abundance of light tones and a lack of most shadows.
The key and fill lights are usually closer in intensity with the goal being to lessen shadows and minimizing contrast.
The final product is a bright, often ethereal, image – think a seascape shot that's overexposed to the point of the sky and water merging into one, and all that stands out is a cormorant diving into the water to pick up dinner.
It might help to picture high-key images if we explain their opposite: low-key photographs.
In contrast to a high-key image, low-key images are characterized by its use of darker tones and high contrast to create a moody, dramatic image that's rich in shadows.
Low-key lighting tends to have an air of mystery and drama, quite the opposite of the often bright vibe of high-key.
Both high-key and low-key photos offer a unique challenge and a departure from traditional methods, encouraging an artistic, experimental approach to exposure and lighting, pushing the boundaries of conventional photography rules.
This sense of innovation and freedom is part of what makes high- as well as low-key photography so appealing.

High-key lighting can be used for nature photography to emphasize light and texture while creating a dreamy atmosphere.
How is high-key photography used?
Originally used in the film and television industry to deal with technological limitations, it has since evolved into an artistic photography technique that's found a home in a range of genres, from high-key portrait photography to product photography, and, yep, you guessed it, even nature photography.
High-key lighting immerses your subject in a flood of light, creating a minimalistic look that emphasizes the subject without the distraction of a complex background or dark shadows.
This allows viewers to connect with the subject without distraction, whether it's a compelling high-key portrait, or an intricate nature close-up or in bright landscape photography with that signature high-key look.

Use the bright sunlight and white backgrounds to your advantage when applying the high key technique in nature photography.
Applying high-key techniques in nature photography
High-key photography can be a powerful tool in nature photography. It offers a different perspective and allows you to convey the beauty of nature in an artistically compelling way.
High-key shots bring out a unique perspective, often emphasizing the delicacy and serenity of the natural world by transforming an ordinary scene into something dreamy, while bringing the viewers attention to your subject, much like how it's used in portrait and product photography.
This method of photography can open up a whole new world of possibilities, offering nature photographers a unique challenge in its departure from traditional methods.
It encourages an artistic, experimental approach to exposure and lighting, pushing the boundaries of conventional photography rules. This sense of innovation and freedom is part of what makes it so appealing.
The key (har har) is to experiment with exposure and lighting and to not shy away from post-processing adjustments. Embrace the brightness, and you'll achieve images that are light, airy, and full of optimism.
You'll find that this technique can truly transform the way you capture the natural world.

High-key techniques can be used in situations when most wildlife photographers would put the camera down – like a white bird against white clouds. Instead, think about how you might adjust your settings and create a cool moment made all the more interesting by leaning into the high-key strategy.
Ideas for high-key nature photos
Before we get into the nitty-gritty details of creating high-key images, let's look at few ideas to get your creative juices flowing.
Misty Mornings
Capture the ethereal beauty of a foggy morning. Overexpose to emphasize the fog and diffuse the surrounding elements, creating an image that exudes calm and tranquility. For example, a forest shrouded in mist would appear soft, with the trees in the background gently fading into the white light.
Winter Landscapes
That high-key look works wonderfully in snowy landscapes. Overexpose your shot to create a near-monochrome image with subtle tones of white and gray. For instance, an image of a lone tree in a snow-covered field can be taken with high-key technique to emphasize its isolation against the vast expanse of white.
Harsh Daylight
The middle of the day isn't usually the ideal time for wildlife photography. But that's when you pull high-key techniques out of your bag of tricks. An animal against a bright sky can make a fantastic subject for a high-key photo

Faced with a beautiful bird perched against a slate gray sky, one might be tempted to say nevermind and walk away. But here's where high-key shines. The technique became the perfect way for me to get an interesting portrait that doesn't sacrifice detail in the subject.
Gray Days
Just like hours of harsh sunlight, days when the sky is slate gray can be great for high-key wildlife photos. The cloud cover acts as a giant softbox. The subject is usually darker than the surrounding gray sky, creating the perfect high key situation. You can expose for the darker subject, pushing the brightness of the gray sky or background – yet the soft light allows you to maintain lots of detail in the highlights and shadows.
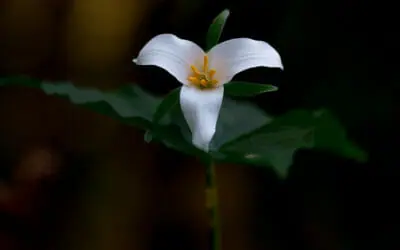
Blooming Flowers
Capture a high-key photo that highlights the vibrant colors of a flower field on a bright sunny day. Overexposing the shot will create light tones that contrast brilliantly with the vivid colors of the flowers. For example, a field of red poppies against a bright sky can be made to appear even more striking.
Backlit Leaves
High-key lighting techniques can be used to shoot leaves against the sun, creating a luminous effect with the light pouring through the veins of the leaves. For instance, a leaf caught in the glow of the afternoon sun, with its intricate veins standing out, can be a captivating subject.
Water Bodies
High-key style can add a dreamlike quality to images of rivers, lakes, or the sea. Overexpose to capture the shimmering reflections and stunning contrast between the water and the sky. Imagine a calm stream reflecting the sky, with a whooping cane standing against the mirror-like water surface.
Now that we've hopefully whetted your high-key appetite, let's cover the how-to details.

This beautiful giraffe in the bright sunshine is the perfect subject for a high key photo! Tip: When choosing an environment to take high key photos of nature, remember to look for locations with plenty of light and minimal shadows.
How to shoot high-key nature photography
1. Choose the right environment
High-key photography is best achieved in environments with abundant natural light, but overcast days can also provide the perfect diffused light you need for this technique.
Early morning or late afternoon light can provide a softer, more directional light that can be used to your advantage.
Pay attention to the natural elements in your environment such as snow, water or fog which can reflect light and contribute to the high-key look.
For example, a snowy landscape can act as a natural reflector, illuminating your scene from below and creating a beautiful high-key effect.
The goal is to maximize the light in your composition while minimizing harsh shadows and stark contrast.
2. Focus on composition
When it comes to composition here, less is often more. Striving for simplicity can help to emphasize your subject and make your image feel serene and uncluttered.
The background is an integral part of the composition, so you'll need to be strategic when choosing. With studio shooting, it's easier because you can set your subject up against a completely white background, but with nature photography we're limited by the scenery available as well as the available light coming into the picture.
Keep an eye out for a bright background, preferably pale and even-toned, so that the subject can pop out.
For instance, dead branches against a pure white backdrop are ideal, but you can also take a load of high-key photos in dusty deserts or places that don't have a lot of vegetation.
With high-key images, use negative space to isolate your subject and make it stand out – the bright, overexposed areas in high-key photos make for excellent negative space.
And, as always, pay attention to the lines and shapes in your composition.

Use the high-key look to turn a common image into something unusual. This is a photo of jellies at an aquarium. Instead of the usual pink-against-blue look, I used post processing techniques to change it into a monochromatic minimalist nature photo.
3. Make use of fill lights
In high-key nature photography, the use of fill light can greatly enhance your image. Whereas the key light is responsible for highlighting the subjects' form, fill lights expose the shadows of created by key lighting.
Fill light is not intended to replace your main – or key-light source, but rather to complement the key light, balancing out your shot by reducing harsh shadows and softening contrast.
For nature photographers who primarily work with natural light, the concept of fill light might seem a bit out of place, but it's all about understanding how light interacts with your subject and environment.
On a bright day, for instance, you might find that the sun provides too much contrast, casting harsh shadows on your subject.
A reflector can be used to bounce light back onto your subject, effectively acting as fill light.
Alternatively, in overcast weather, the cloud cover can serve as a natural diffusion panel, creating a soft-fill light effect across your scene.
In essence, manipulating fill light is all about observing and using the light at your disposal to achieve that high-key look.

For a high-key photo, look for a simple background to draw attention to your subject and highlight its features.
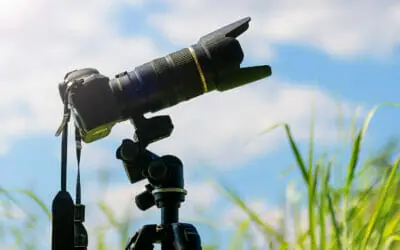
4. Get assistance from equipment
While high-key photography relies a lot on natural light and camera settings, the right equipment can significantly elevate the quality of your shots and make the process smoother. Here's an overview of some key pieces of equipment to consider:
❂ Reflectors and diffusers
Reflectors and diffusers are vital tools in high-key photography as natural light doesn't always do the trick.
Reflectors bounce light into shadowy areas, reducing contrast and helping you achieve the desired high-key effect.
Diffusers, on the other hand, can soften harsh light, making it more evenly distributed across the frame and reducing harsh shadows.
Additionally, using reflectors can help bounce light into shadowy areas, further reducing contrast.
❂ Light meters
A light meter allows you to accurately measure the light in your scene, which can help you make more precise decisions about your camera settings to achieve the overexposed effect.
❂ Additional light sources
The high-key lighting setup should create a scene where the entire setting is filled with enough light that shadows and contrast are as minimal as possible. To ensure this, bring along additional light sources, like powerful strobes, to create bright lighting conditions to nail the high-key style.
❂ Lenses
The choice of lens can significantly impact your high-key photographs. Fast lenses with a wide aperture (like f/1.4 or f/2.8) can help you create a high-key effect by letting in more light, resulting in an overexposed image. They also provide a shallow depth of field, which is helpful for isolating your subject from the background.
❂ Tripods
A tripod can help you avoid camera shake when using slower shutter speeds. It stabilizes your camera, allowing you to use slower shutter speeds without worrying about camera shake. This enables you to let in more light for an overexposed image without compromising on sharpness.
❂ Filters
While not always necessary, filters can sometimes be helpful in high-key photography. Neutral Density (ND) filters can be used to reduce the amount of light entering the lens, allowing you to use slower shutter speeds or wider apertures in bright conditions. Polarizing filters can help manage reflections and deepen the sky, which can be useful when trying to achieve a high-key effect.

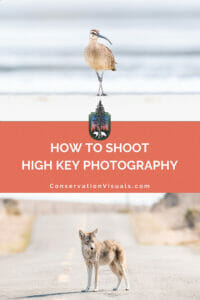
I photographed this coyote against a background of snow. Because of the snowy setting, which makes your camera want to underexpose for the scene, I used exposure compensation to quickly expose for the coyote, wash out the snow, and get that high-key effect.
5. Find the best camera settings
In terms of camera settings, you'll want to start by setting your camera to manual mode and, after that, well there's really no ‘right' or ‘wrong' setting.
We'll help you get started, but experimentation is key, so don't be afraid to try different settings to see what works best for you.
❂ ISO
Start with a low ISO – around 100 or 200. This is because a higher ISO can introduce noise into your image, which may detract from the soft, serene feel typical of high-key photos. However, if you're shooting in low light conditions and need to brighten your image, you might need to bump up the ISO.
❂ Aperture
Next, consider your aperture. A wider aperture allows more light into the camera, which is useful for creating a high-key effect. Plus, a wider aperture will give you a shallower depth of field, allowing you to keep your subject sharp while the background becomes beautifully blurred.
❂ Shutter speed
To achieve the high-key effect, you will need to let a lot of light into your camera. This means using a slower shutter speed, but be careful to avoid any unwanted motion blur. If your subject is moving, you'll need a faster shutter speed to freeze the action.
❂ Exposure compensation
In high-key photography, you intentionally overexpose your image to wash out harsh shadows and create a bright, airy feeling. You can use your camera's exposure compensation feature to dial in a positive exposure value. Start with +1 or +2, but be careful not to lose detail in important areas of your image.
❂ Shoot in RAW
Shooting in RAW is particularly beneficial as RAW files capture all the data from your camera sensor without any processing, providing a high level of detail and allowing you to adjust the exposure, white balance, and highlight details in post-processing without losing image quality.

High-key photos work great in both color and black and white. The trick is to notice when to lean into what seeeeeeems like overexposing, but in reality creates the perfect stage for the subject.
6. Post-processing
Before editing, we should obviously aim for the desired result as much as possible while at the camera. But that's not always the reality especially with high-key images.
To make the subject truly stand out, we amp up the structure, detail, and contrast but lower it for the background. (The exact process is also done for low-key photography, only in reverse.)
Simply ensure you have a brighter background than the subjects – you can even try to bring it to a pure white!
❂ Levels and curves
Firstly, using the ‘levels' and ‘curves' tools in your photo editing software can be very useful.
With levels, you can adjust the tone and contrast of your image – move the white point slider to the left to brighten your image, and the black point slider to the right to reduce contrast.
The ‘curves' tool can be used to further control the brightness and contrast in your image. By creating an ‘S' curve, you can brighten highlights and darken shadows, enhancing the high-key effect.
❂ Dodge and burn
Dodge and burn are two other useful tools for high-key post-processing. ‘Dodging' allows you to lighten specific areas of your image, which can be useful for reducing shadows and enhancing the high-key effect. ‘Burning', on the other hand, allows you to darken areas, which can be useful for adding depth and detail.
❂ High-key filter
Some editing software includes a ‘high key' filter that can give your images a bright, washed-out look. This can be useful for enhancing the high-key effect, but be careful not to overdo it – you want to preserve detail in your image, not wash it out completely.
❂ Saturation and vibrance
Finally, consider adjusting the saturation and vibrance of your image. In high-key photography, colors are often subtle and desaturated, so you may want to reduce the saturation of your image. However, you can also use the vibrance tool to selectively enhance the saturation of less saturated colors, helping them to stand out against the bright background.
Post-processing should enhance your image, not completely change it. The goal is to subtly emphasize the high-key effect, not to create an entirely new image.
As always, experimentation is key – don't be afraid to try different settings and techniques to see what works best for your high-key nature photos.
In the end, high-key photography is not just about overexposing an image; it's a creative technique that requires careful control of exposure, composition, and post-processing.
So enjoy playing with different settings and techniques until you achieve the desired effect.
With time and practice, you can master this technique and create stunning images that capture the unique beauty of nature.


")