Read Time: 14 minutes
Capturing the elegance of birds in flight is no simple feat. Quick reflexes, precise timing, and advanced camera techniques… well, there’s no getting around that they’re a requirement.
But if you love to photograph birds at all, then photographing them in flight is a wonderful challenge that is addictive, rewarding, and worth every cuss word and “Where’d it go??” that you’re sure to utter along the way.
This guide covers focused strategies for photographing birds in flight for —or, as I like to say, BIF-ing—from selecting the best equipment to understanding and adjusting camera settings to freeze motion in crystal-clear detail.

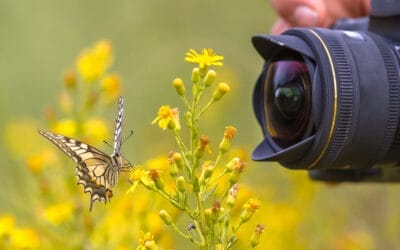
Photo: Rafal Szozda/Shutterstock
When starting out, you might lean on luck for keeper shots. But with practice, you’ll be able to plan, predict and capture amazing in-flight shots.
Quick-start tips for beginner bird photographers
Bird Whisperer 101
Knowing your subject’s behavior and flight patterns is like having insider trading info. So, understanding the A-B-Cs of bird behavior and flight patterns is essential.
You’ll need to become a part-time ornithologist, studying everything from daily routines to the specific flight styles of different species—be it the erratic darting of a warbler or the majestic soar of a hawk.
Get familiar with their daily habits and quirky aerial maneuvers.
Gear Up
Equipment matters a ton here. Whether it’s the hefty reliability of a DSLR or the swift performance of a mirrorless camera, your choice will frame your success.
Pair that with a lens that can do justice to those distances—think telephoto for that crisp, clear close-up, or maybe a prime lens when quality is king.
Here are our top picks for cameras for bird photography, and lenses that’ll help you get stellar shots.
Settings Smarts
Get to know your camera settings and how to dial them in quickly.
For flying birds, think high shutter speeds for laser-sharp images and playing around with exposure to get the lighting just right.
Don’t be afraid to crank that shutter speed to at least 1/2500s, play with metering modes to get the exposure spot-on, and fine-tune your focus to keep your subjects sharp as a tack (unless, of course, you’re going for the artsy blurred motion of slower speeds).

Photo: Jaymi Heimbuch
One of the toughest elements to master is keeping your focus on the eyes, and not on a fluttering wing. Pay extra close attention to practicing keeping your focus point on the bird’s head.
Study the behaviors of bird species
Flight Patterns
When it comes to flight patterns, every bird flaps to its own beat. Take the sparrow, small yet sprightly, darting about with bursts of energy—predicting its next move means getting used to its quick sprints.
Woodpeckers? They’re the flap-flap-float type, with quick bursts of wing beats and an undulating pattern.
For the regal raptors like hawks, it’s all about the slow, calculated glide—except for when they dive!
Understanding different flight patterns is a huge advantage for knowing how to follow along with your lens.
Activity and Behaviors:
Next, to maximize your chances of interesting flight shots, you want to know when your target species is active.
Observing birds at various times of the day, and during different weather conditions, can provide insights into how they interact with their environment and each other.
For instance, some birds may have specific times when they are most active or are known to engage in certain behaviors, such as feeding or mating rituals.
By visiting bird habitats during these times, you can increase your chances of capturing great shots of a flying bird,plus other cool behaviors as an extra wonderful bonus.
Subtle Cues:
It’s also helpful to note the tell-tale signs of when certain species are about to take flight. For instance, many birds will defecate right before taking flight. So if you see a bird poo, get your finger on that shutter button and be ready.
Learn with a Community:
In addition to direct observation, consulting field guides, joining bird-watching groups, and engaging with local ornithologists can expand your knowledge of bird behavior.
These resources are great for learning the nuances of different species’ flight patterns and behaviors.
Remember, the more time you spend observing and understanding your subjects, the better equipped you’ll be to photograph them.

Photo: Jaymi Heimbuch
As you study bird behavior, you’ll more easily notice interesting opportunities for photos that go beyond portraits – like when a great frigatebird is harassing a brown pelican for a meal.
Choosing the right equipment for bird photography
The camera body and lenses you use, and the stabilization tools you equip yourself with, can make a significant difference in the quality of your photos.
Camera Types:
When it comes to bird photography, DSLR and mirrorless cameras are the choices.
DSLR cameras are favored for their robustness and long battery life, with a wider selection of lenses available.
On the other hand, mirrorless cameras, while having shorter battery life and longer boot-up times, offer advanced autofocus systems and high frame rates that can be beneficial in capturing precise images of birds during flight.
Ultimately, the choice between DSLR and mirrorless cameras depends on your specific needs and preferences.
Camera Lenses:
Your choice of lens can significantly influence the quality of your bird photographs. Some important lenses for bird photography include:
- Telephoto lenses, which enable you to capture clear, close-up images of birds in flight. These lenses allow you to maintain a respectful distance from your subjects, ensuring they behave naturally and are not disturbed.
- Zoom lenses, which offer versatility and allow you to adjust the focal length to capture birds at different distances.
- Prime lenses, which have a fixed focal length and often offer superior image quality.
For those tiny, twitchy types, a lens reaching 600mm might just spy a sparrow from afar without a scare.
Bigger birds demand less magnification, and depending on the situation, you may need something more like a 300mm or a 100-400mm.
But every millimeter helps in keeping your distance respectful and your pictures poignant.
Tripods, Monopods, and Supports:
Stability isn’t just about calm hands; a tripod with a gimbal head can turn a windy day’s challenge into a breezy success.
Telephoto lenses, being sensitive to movement, can amplify camera shake, making stabilization a significant concern when photographing fast-moving birds.
A sturdy tripod, preferably paired with a good gimbal head, is recommended for stabilizing shots.
Monopods, while less stable than tripods, can be a convenient alternative. For on-the-move missions, a monopod offers that sweet spot of stability and mobility.
If you’re photographing from a vehicle, consider using a bean bag to help steady your lens and dampen any vibration from a running motor. We love and recommend the LensSack from LensCoat.

Photo: Jaymi Heimbuch
Fast shutter speeds are required for freezing flapping wings. However, have fun experimenting with slower shutter speeds to create a pretty blurred effect too. Just know what effect you’re going for in the moment, and adjust your shutter speed to suit the situation.
Camera settings for birds in flight
After choosing your equipment, the next step is to perfect your camera settings.
High shutter speeds freeze feathers in motion, while the right f-stop keeps the depth of field just deep enough to detail every feather without turning the background into an abstract painting. Low ISO keeps the grain at bay, and manual controls let you adapt quicker than a startled starling.
Depending of course on your creative approach, generally the ideal settings for bird photography include:
- Shutter speed: Use a shutter speed of at least 1/2000s to ensure sharp images.
- Metering mode: Experiment with different metering modes to find the one that works best for your shooting conditions.
- Exposure: Adjust the exposure settings to achieve the desired brightness and contrast in your photos.
Focus:
We can’t understate the importance of getting your focus point in the right spot, and following the bird’s flight path to maintain focus.
A challenge many photographers have with birds in flight is that the focus point is on a wing-tip or tail, rather than the face or body.
So, we recommend using a single autofocus point with assisting points for balancing you having specific control of the focus point with a little help from the camera’s autofocus system.
Of course, these days many cameras have extraordinary autofocusing capabilities that use AI to assist with following your subject. Some models even have bird-specific autofocus modes, with the camera detecting and following a bird’s eye. This absolutely comes in handy for bird-in-flight photos if you have that capability with your camera.
Regardless, the continuous autofocus mode (AF-C) is vital for keeping fast-moving birds in sharp focus while they are in flight.
However, some photographers may prefer using manual mode to have more control over their focus point.
Another technique that can aid in achieving sharp focus is back-button focus, which allows you to separate focusing from the shutter button. This provides more accurate focusing for dynamic subjects like birds in flight, by utilizing focus points effectively.
Exposure:
Getting the exposure just right is the next big challenge for birds in flight photography. That’s because often, you’re photographing a bird against a much brighter backdrop, like the sky, or a much darker backdrop like a forest canopy, or you’re following a bird as it flies across sky, forest, sky, meadow…. talk about an exposure headache!
Here are some tips for adjusting exposure settings:
- Increase the shutter speed to obtain clearer images of birds in flight.
- Adjust the aperture to around f/8 to maintain sharpness and depth of field in flight photography.
- Use the lowest ISO value the conditions allow for optimal image clarity.
- Consider using manual exposure settings to effectively deal with changing light conditions.
Metering Modes:
Choosing the right metering mode can help you achieve accurate exposure of birds against different backgrounds.
Spot metering, for example, evaluates a small area of the frame, typically at the center, and is useful for precise metering off a subject like a bird against a complicated background.
On the other hand, evaluative or matrix metering assesses the entire scene to set exposure, making it ideal for dynamic lighting environments and erratic bird flight paths.

Photo: Jaymi Heimbuch
As you grow your skills of simply getting the shot, you open up the door to creative play with your photography. Experiment with things like silhouettes, backlighting, and unique moments of action.
Composing striking images of birds in flight
Once you’ve mastered the technical aspects, it’s time to focus on composition. A beautifully composed photograph can captivate the viewer and tell a compelling story. In bird photography, this involves using the rule of thirds, the rule of space, and choosing the right perspective.
Let’s explore these elements in detail.
Rule of Thirds and Rule of Space:
The rule of thirds and the rule of space are fundamental composition concepts in photography. By positioning the bird near one of the intersecting lines of the frame, which is achieved by dividing the frame into thirds both horizontally and vertically, we can enhance motion without blur and create a more dynamic image.
Similarly, the rule of space suggests leaving more empty space in the direction the bird is flying, leading to compositions that feel more balanced.
Perspective:
Experimenting with different perspectives can help you capture unique details and angles of birds in flight. Shooting from a low angle, for example, can often yield more attractive images, capturing unique details of a bird’s feathers from beneath.
On the other hand, capturing birds from higher vantage points or at eye level can expose distinctive colors and patterns on the bird’s wings that are not as observable from lower perspectives, especially when capturing a bird flying.
Capturing Action and Interaction:
Capturing action and interaction can add a dynamic element to your bird photographs. Including meaningful elements of a bird’s environment in the composition can provide balance and context, enhancing the overall image.
Furthermore, observing changes in a bird’s posture can indicate stress, which suggests that the photographer is too close and should maintain a respectful distance.
Anticipating the movements of birds can be quite a challenge, especially when they’re in flight. One technique that can help is to aim your focus on the facial area of the bird. This not only allows you to capture important details but also helps you anticipate the bird’s movements.
Positioning yourself strategically to ensure the bird flies across an unobstructed field of view is also crucial. And remember, preparation is key. Always have your camera set up and ready to capture those sudden moments when a bird takes flight.

Photo: Victor Tyakht/Shutterstock
Practice your skills in easy areas with lots of bird activity – whether it’s a park with plenty of sparrows or ducks, or a backyard bird feeder.
Timing and lighting for bird photography:
Timing and lighting are key elements in bird photography. Capturing birds in flight during the first two hours after sunrise and the last two hours before sunset provides the most favorable lighting conditions. But how can we use these conditions to our advantage? Let’s find out.
Golden Hour:
The golden hour, which occurs shortly after sunrise and before sunset, offers soft and warm lighting conditions that enhance the colors of birds.
During summer in some locations, the golden hour can last for several hours, offering extended opportunities for bird photography.
The quality of light during the golden hour can significantly enhance the colors and overall aesthetic of your bird photography.
Front Lighting and Silhouettes:
Front lighting and silhouettes can create visually appealing images of birds in flight. Aiming to have the sun directly behind you will illuminate the bird well and reduce shadows on the bird’s head.
Moreover, shooting against the light with the sun positioned behind the bird can lead to fast shutter speeds and prominent silhouettes.

Photo: Jaymi Heimbuch
So much happens in flight for various bird species – from hunting, to courting, to feeding young. In no time, you’ll be witnessing birds in action in beautiful and surprising ways!
Practice makes perfect: Honing your skills
Just like a bird learning to fly, mastering bird photography doesn’t happen overnight. It takes plenty of practice and a good dose of patience, but trust me, the thrill of nailing that perfect shot makes every moment worth it.
Whether you’re getting the hang of the panning technique or dialing in your camera settings, each step is a leap towards capturing those awe-inspiring moments in the sky.
Tracking Exercises
Dipping your toes into bird photography? Start with something a bit more grounded—like garden birds. These little critters offer a fantastic playground to refine your tracking and focusing skills without venturing too far.
Practicing with these backyard flyers is an excellent primer for the unpredictability of shooting birds in flight.
Mastering panning is essential here—it’s about moving in sync with your feathered subjects, keeping them sharp and focused as they zip across your frame. It’s a skill that pays dividends when you’re trying to keep up with faster, wilder birds.
Experimentation
Pushing your boundaries through experimentation is the secret sauce to a flavorful bird photography portfolio.
Each new location brings its own set of challenges, from shifting light conditions to varied backdrops, all serving to sharpen your adaptability in the field.
Moreover, diversifying the species you shoot can vastly improve your agility in adjusting techniques to match different birds’ unique antics and flight patterns. Each bird dances to its own tune, and learning these rhythms is key to capturing their motion with finesse.
Final Thoughts
Capturing the essence of birds in flight is a blend of artistry and technical prowess. It demands an intimate understanding of avian behaviors, a firm grip on camera mechanics, and a creative eye for composition.
Ultimately, it’s an incredible way to ramp up your skills across all areas of you wildlife photography. So, pack your gear, set your sights high, and let the adventure begin.

Photo: Jaymi Heimbuch
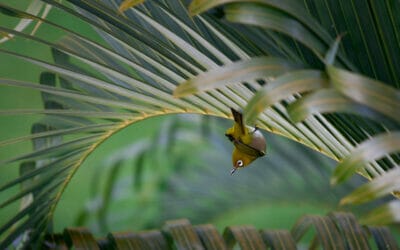
Tip: Watch for tell-tale signs that a perched bird is about to take off. That way, you can capture them from the beginning of their flight and follow them across their flight path.

Photo: Jaymi Heimbuch
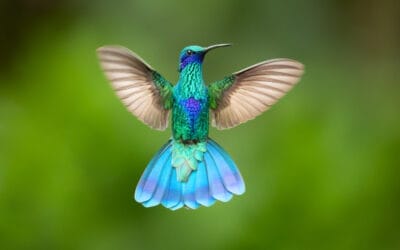
Tip: If you know the behaviors of a certain species, you can predict where they’ll fly, why they fly there, and how they’ll fly there. For instance – a hummingbird that is going to hover at flowers to feed. That means predictable shots!

Photo: smutan/Shutterstock
Tip: When photographing flocks of birds, create plenty of frames. Then, as you’re looking through your images, try to choose frames that have interesting patterns, shapes, or lines that keep the eye moving across the scene.

Photo: JamesChen/Shutterstock
The most important tip: Have FUN. Birds in flight can be a frustrating photographic endeavor. So, rather than dwell on shots you missed, think of each one as a wonderful opportunity to learn more about that bird species and what you’ll try next time you raise your camera to your eye.