Read Time: 8 minutes
For most people, a rainstorm can ruin an otherwise perfect day. But for landscape photographers, it can be a dream situation! Seeing the storm clouds approach inspires mixed feelings of excitement, fear, and caution, all of which we use in storm photography.
If capturing storm photographs excites you and you're eager to get started, you're in the right place. Here are our best tips and strategies for shooting storms.
Location scouting and timing
One of the key elements in storm photography is scouting for the perfect location.
Ideally, you should find a vantage point that allows you to capture the vastness of the storm and the landscape below.
Elevated places like hills or tall buildings often work well.
However, while scouting, you should also be mindful of your safety. Choose locations that provide enough shelter and quick exit routes in case the storm becomes too severe. (We'll cover safety in more detail in just a moment.)
Monitoring weather forecasts is crucial to anticipate the arrival of severe weather conditions.
Technology is your best ally here: use weather tracking apps and websites to keep an eye on storm formations.
A few great resources include:
- Weather Underground: Known for its hyper-local weather forecasts, Weather Underground can help you pinpoint the exact areas where storms will hit.
- AccuWeather: With an intuitive interface, AccuWeather offers real-time updates, severe weather alerts, and a detailed weather outlook.
- RadarScope: A professional's choice, RadarScope provides detailed radar data for storm tracking and analysis. You can download it for Android or iOS.
- The Weather Channel: This app delivers hourly, daily, and weekly forecasts, and its severe weather alerts can keep you updated on incoming storms.
Look for conditions that usually lead to storms, such as sudden temperature drops or high humidity levels.

Photo: Lukas Jonaitis/Shutterstock
Storms that arrive or pass by near sunrise and sunset offer opportunity for gorgeous images filled with color.
When it comes to timing, remember that patience is key. Often, the most dramatic images are captured just before the storm hits or right after it passes.
The so-called ‘golden hour' for storm photography is when the sun is either rising or setting. The warm glow contrasted with the dark storm clouds can result in truly breathtaking photos.
If you're hoping to capture images of lightning strikes, there are some specific strategies to use. Check out our guide on lightning photography for tips!
Choosing the right camera equipment
In storm photography, the choice of equipment significantly influences the output of your shots.
Here are some of the essential gear you'll need:
1. Wide-Angle Camera Lenses
A wide-angle lens is an excellent choice as it allows you to capture expansive landscapes and dramatic skies simultaneously, providing context to the scene. The wide-angle perspective can also give a sense of scale and depth, enhancing the storm's intensity in your photographs. Choose a wide-angle zoom so you can experiment with different focal lengths for unique compositions.
2. Lightning Trigger
A lightning trigger is another essential tool when photographing storms. This device detects the flash of a lightning bolt and triggers your camera to capture that split-second moment. A lightning trigger can increase your chances of successfully photographing lightning, especially during daytime storms when long exposure techniques are less effective.
3. Window Mount
When the weather is too harsh to shoot outdoors, a window mount can be a lifesaver. It allows you to set up your camera using your car window, keeping you and your gear safe while still capturing the storm's intensity.
4. Camera Rain Covers
Rain protection is essential, so invest in a robust camera rain cover. These covers are designed to shield your camera and lens from the elements while still allowing you to operate the controls. They're usually made from waterproof material and come in various sizes to fit different camera and lens combinations. Some rain covers even have clear windows so you can see your camera's screen and controls. Make sure you get one that fits your gear snugly.
5. Lens Hood
A lens hood is surprisingly effective at keeping raindrops off your lens during a light shower. It won't provide full protection, but it can certainly help maintain a clear shot for as long as possible.
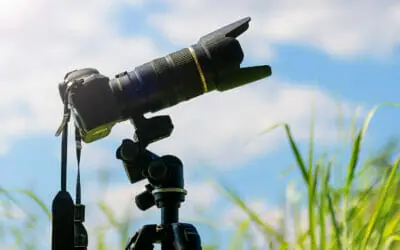
6. Sturdy Tripod
With high winds and unpredictable elements, a solid, reliable tripod will keep your camera steady, ensuring sharp images. Moreover, as you'll be using slower shutter speeds to photograph lightning, the importance of minimizing camera shake can't be overstated.
Choose a tripod made of heavy-duty materials like carbon fiber, which offers stability without excessive weight. Some tripods even have hooks at the bottom to hang a camera bag or weight for added stability.
7. Dry Cloths
Always carry a pack of dry microfiber cloths and dry terrycloth towels in your bag. You'll use them frequently to wipe away any water that does get on your gear, helping prevent damage.
8. Waterproof Camera Bag
Last but not least, ensure your camera bag is waterproof or that you have a rain cover for it. This will protect your gear when it's not in use and allow you to pack away quickly if the rain gets too heavy.

Photo: Smit/Shutterstock
The beauty of storm photography most often lies in the dramatic cloud formations, like these incredible mammatus clouds.
How to stay safe
While the thrill of capturing the perfect storm photo can be exhilarating, it's essential not to neglect your safety while venturing out to photograph a storm or shooting lightning. Remember, no photograph is worth risking your life over.
Here are some crucial safety tips to bear in mind:
❂ Stay informed about the weather
Keep a close eye on weather updates and storm forecasts. There are a plethora of apps and websites that provide real-time weather information. Use these tools to avoid getting caught in severe conditions without warning. Flash flooding can occur instantly during storms, and moving a vehicle takes a lot of time. So be aware of your location and flash flood potential at all times.
❂ Maintain a Safe Distance
Lightning can strike farther than you think, so keeping a safe distance is crucial. If you can hear thunder, you're within striking distance of a lightning storm. Follow the 30-30 rule: when you see a lightning bolt, count the seconds until you hear thunder. If it's less than 30 seconds, seek shelter and photograph from a safe cover.
❂ Seek Shelter
If you're caught in a storm with no nearby indoor shelter, your car can serve as a safe haven. Never seek shelter under a tree or other tall, isolated objects, as they tend to attract lightning. Lightning bolts typically strike around open water and mostly open environments, so to avoid being struck by lightning, keep close to an enclosed shelter.
❂ Wear the Right Clothing
Dress in layers and waterproof clothing to stay warm and dry. Wet, cold conditions can lead to hypothermia.
❂ Let Someone Know Your Location
Always inform someone of your whereabouts when you plan to go out for storm photography. Provide them with details of your intended locations and an estimated return time.
❂ Carry a First-Aid Kit
A first-aid kit is a must-have in any photography bag. It should include bandages, antiseptic wipes, medical tape, and any personal medication.

Photo: Guangli/Shutterstock
It's often the arrival or retreat of storms that make the most interesting images, like this storm just starting to form at Yosemite National Park.
Camera settings for capturing storms
Your camera settings play a crucial role in determining the quality and depth of your images. The best aperture and shutter speed will be highly variable, depending on the lighting conditions that change frequently in storms. Always take a test shot and adjust the settings from there.
Aperture, shutter speed, and ISO
Generally, an aperture of f/5.6 to f/11 should provide you with a decent depth of field while allowing sufficient light into the camera.
A slow shutter speed of around 5 to 30 seconds can work well for capturing lightning or if you'd like to highlight the movement of clouds. Otherwise, a shutter speed of 1/200 to 1/500 should be sufficient for regular storm clouds.
Keep the ISO as low as possible to reduce noise while still obtaining proper exposure. An ISO setting of 100 to 200 is great for daylight conditions, but you'll likely need to increase the ISO to around 400 or higher for evening storm sessions or low-light conditions.
Long exposures
One of the key settings to consider is the use of long exposures. This involves keeping the shutter open for extended periods, allowing more light into the camera sensor and capturing the full drama of the storm.
A cable release is often a handy tool for longer exposures. It allows you to keep the shutter button depressed for an extended period without inducing camera shake, which can blur the image.
A cable release also gives you the flexibility to respond instantly to changing conditions, ensuring you capture lightning at just the right moment.
The goal is to keep the shutter open for as long as possible without overexposing the image. This can be a delicate balance to achieve, particularly when lightning is involved, as the intensity of the light can vary dramatically. Experimentation and experience will guide you in finding the optimal settings for your specific conditions.
Manual focus
Setting your camera to manual focus is another smart step in photographing storms. Autofocus can struggle in low light conditions, potentially resulting in blurry or out-of-focus shots. But with manual focus, you have complete control over the focus point so you can more easily capture the sharp details you want in the scene.

Photo: Leighton Collins/Shutterstock
Storms near a shoreline make for dramatic wave photos. It's a thrilling opportunity, but also dangerous. Be extra, extra cautious when photographing in these kinds of locations.
Composition tips for storm photography
Rule of Thirds
One of photography's most commonly used composition rules is the Rule of Thirds. Imagine your frame divided into nine equal sections by two equally-spaced horizontal lines and two equally-spaced vertical lines.
The Rule of Thirds suggests placing key elements of your scene along these lines or at the intersections of them for a balanced and visually pleasing shot.
For storm photography, you might place the horizon on one of the horizontal lines, with an impressive lightning bolt striking at one of the intersections.
Leading Lines
Leading lines guide the viewer's eye toward the main subject of your image. This could be a road leading towards a storm, a stretch of beach leading towards a waterspout, or a line of trees pointing towards a lightning strike.
Negative Space
Play with using negative space in your storm photos. Negative space refers to the area surrounding your photo's main subject. This space can help to highlight the main subject, and in storm photography, it can be particularly dramatic.
A large, stormy sky occupying two-thirds or more of your frame can give a sense of the vastness and power of the weather.

Photo: Cammie Czuchnicki/Shutterstock
With a storm's retreat, watch for rainbows! This colorful phenomenon is a welcome sight after a storm. Here are tips on how to best photograph rainbows.
Post-processing techniques for storm photographs
Editing is where the true magic happens. It's the stage where you can transform your raw images into striking visual narratives.
1. Raw Image Processing
Always shoot in RAW format, as it allows for more flexibility in post-processing. This format captures all the data from the camera sensor, providing more room to recover hidden details in light and shadow.
2. White Balance & Exposure Adjustment
Storm lighting can be tricky, and your camera's automatic white balance might not always get it right. Adjust the white balance to ensure the colors in your image are accurate. Similarly, tweak the exposure to highlight the dramatic contrast in your storm photos.
3. Contrast & Saturation
Enhance the drama of your storm photos by increasing the contrast. This brings out the darkest darks and the lightest lights, adding depth to your image. Adjusting the saturation can also help emphasize the vibrant colors that often appear during storms.
4. Sharpening
This tool can help clarify the details in your image, making the drama of the clouds or a lightning strike more, well, striking. But remember, moderation is key. Over-sharpening can introduce noise into your image.
5. Noise Reduction
Shooting in low light often leads to grain or noise in your photographs. Most image editing software has noise reduction tools that can help smooth out your image while maintaining the important details.
6. Cropping
Don't be afraid to crop your image for a more impactful composition. This can draw attention to the main subject of your photo, whether that's a lightning bolt or an ominous cloud formation.
This polishing phase aims to enhance your image, not overpower it. You want to bring out the best in your original shot, not create something completely different.
Practice and perseverance are your best allies when you're storm chasing. Each storm provides a unique canvas, ready to be captured and shared with the world. Stay patient, stay curious, and most importantly, stay safe.
The beauty of nature is vast and unpredictable, and your journey to capture it should be a thrilling experience. Go forth and create your next masterpiece under the stormy skies.


")