Read Time: 8 minutes
Have you ever marveled at the electrifying beauty of a lightning bolt slicing through a stormy sky and wondered how to capture the spectacle on camera?
You're not alone. Most nature photographers have experienced the frustration of missing that split-second, spectacular shot of lightning.
But here's the good news: With a bit of strategic planning and the right techniques, you can get those jaw-dropper lightning photos.
In this article, we're going to guide you, step-by-step, on how to photograph lightning and dish on our top lightning photography tips!
Essential camera equipment for photographing lightning
First things first, let's talk about the essential camera equipment that will transform your lightning photography game.
1. Camera
You're going to need a DSLR camera or mirrorless camera that allows for manual control of exposure settings. This is crucial for those long exposures often needed to capture a flash of lightning.
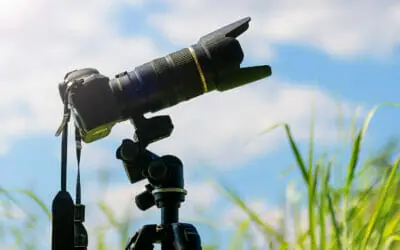
2. Tripod
Since no one wants to see shaky photos, a sturdy tripod is a must-have. It helps you avoid camera shake so your long exposure shots are sharp and allows you to comfortably wait for that perfect lightning strike.
A cable release or wireless remote is also beneficial, allowing you to trigger the shutter without touching (and potentially shaking) your camera.
3. Lens
Now, let's consider lenses. A wide-angle lens is typically the best choice for capturing expansive stormy skies and dramatic landscapes.
However, a telephoto lens can also come in handy if you're further away from the storm or aiming to capture a close-up of a single lightning bolt.
4. Remote Shutter Release
A remote shutter release or a lightning trigger is a valuable addition to your gear; it allows you to capture lightning shots without physically pressing the camera's shutter button, thereby reducing the risk of camera shake and increasing your odds of seizing that perfectly timed lightning strike.
5. Automatic Lightning Trigger
An automatic lightning trigger, or simply ‘lightning trigger,' is a game-changer in storm photography.
This nifty gadget acts like your personal lightning scout, detecting the rapid rise in brightness when a lightning bolt strikes and automatically triggering your camera's shutter.
The high-speed response of these devices means you're much more likely to nail that perfectly illuminated, high-contrast shot of lightning slicing through the stormy skies.
It takes the guesswork out of the equation, allowing you to focus more on compositional aspects and less on timing the shot.
6. Rain Protection
Lastly, don't forget about protection for your gear. Weather-sealed equipment is ideal, but if this isn't an option, a simple rain cover for your camera can work wonders in keeping your precious kit dry during a downpour.
Now that you're equipped with the right gear let's get ready to capture those electrifying moments nature dishes out during a storm.

Photo: John D Sirlin/Shutterstock
While a tripod typically works for steadying your camera, there's also the convenience of a window mount, which gives you the added safety of shooting from the shelter of your vehicle. Both methods can yield impressive results if used correctly.
Locating the perfect storm for lightning photography
Finding the right storm is key to capturing successful lightning shots. Meteorology plays a significant role in predicting the occurrence of storms and, thus, lightning.
Start by keeping an eye on the weather forecast for your area. Look for predictions of thunderstorms and monitor the weather radar.
Several apps and websites provide real-time lightning maps, which can help you track the storm's path and intensity.
5 Top weather apps for tracking lightning storms
- AccuWeather: This app provides minute-by-minute weather updates and sends alerts when a storm is approaching your specified location. It also offers radar maps to track the storm's path.
- Storm Radar: As the name suggests, this app specializes in tracking storms. The “Future Radar” feature allows you to anticipate where severe weather will go, so you're never caught off guard. You can get it for iOS here.
- Weather Underground: Equipped with interactive radar, satellite maps, and severe weather alerts, it's a one-stop shop for all your storm tracking needs.
- MyRadar Weather Radar: This quick and easy-to-use weather app displays animated weather radar for your current location, allowing you to quickly see what weather is coming your way.
- Lightning Maps: Although not a full-featured weather app, Lightning Maps does one thing and does it well: it provides real-time data on lightning strikes around the world.
Timing is everything
The timing of storms is another vital aspect to consider. Storms that occur around dusk or dawn often provide the best opportunities for spectacular lightning photography.
The contrast between the dark storm clouds and the remaining daylight create a stunning backdrop for your lightning shots.
Choosing the ideal location
Once you've found your storm, you need to find a suitable location to photograph it from. Choose a vantage point with a clear, unobstructed view of the sky.
This could be an elevated location or an open field but remember to always prioritize safety. Avoid standing under trees or near conductive materials like metal fences or power lines.

Photo: Pictureguy/Shutterstock
Capturing different shots of lightning from the same storm gives you images that illustrate the dynamic variations that each bolt can display within the same atmospheric conditions.
Storm Safety! What you need to know
Let's be serious for a moment – we're talking about photographing dangerous natural phenomena. So, one aspect of photographing lightning comes above everything else – our safety.
We don't want to feel the wrath of Mother Nature, nor do we want to test it. Lightning strikes can be fatal, so it's of utmost importance to take safety precautions.
Here are some essential tips to ensure your safety:
- Always maintain your distance: Being too close to a thunderstorm can be extremely dangerous. Maintain a safe distance from the storm, ideally at least 5 miles (or 8 kilometers) away.
- Avoid tall structures: Do not stand near or under tall, isolated structures, such as trees or poles, that could attract lightning.
- Stay away from water: Lightning can easily strike water bodies. Avoid bodies of water like lakes, ponds, and even pools during a storm.
- Find a Safe Shelter: Never go out on the vast open field when a lightning storm occurs. Stay inside a safe shelter, like a car or a building, while photographing lightning. Never seek shelter under a tree.
- Monitor the Storm: Keep a close eye on the storm's movement and intensity. If the storm is getting closer, it's time to pack up and leave.
- Use a Lightning Trigger or Remote Shutter Release: This allows you to set up your camera and then move to a safe distance to trigger the shot, reducing your exposure to potential danger.
- Plan Your Exit Strategy: Always have an identified escape route in case the storm gets too close. Your safety is always more important than the shot.
No photograph is worth risking your life. Always prioritize safety when photographing lightning and thunderstorms.

Photo: Lukas Jonaitis/Shutterstock
An initial test shot during the early onset of a storm are vital for setting up the perfect aperture and shutter speed for the upcoming bolts of lightning.
Camera settings to use for lightning photography
Mastering Manual Mode
To capture the impressive display of a lightning storm, you'll need to take control of your camera and delve into manual mode.
Don't fret; manual mode isn't as scary as it sounds. It's just a matter of playing with ISO, aperture, and shutter speed until you have the right combo for a perfect shot.
Here are basic ISO, aperture, and shutter settings to play with:
❂ ISO
Start by setting your ISO to a low value, typically around 100 or 200. A low ISO minimizes the noise in your image, keeping your shots as clean as possible.
❂ Aperture
The aperture setting can vary depending on the intensity of the lightning and the ambient light. Typically, an aperture between f/5.6 and f/9 is a good starting point.
This allows enough light into the camera to capture the lightning but isn't so wide that it overexposes the image.
However, if the natural light is too low, or you want to bring a more dreamy look by using a shallow depth of field, an aperture as low as f/2.8 can work wonderfully.
Just experiment until you find that perfect sweet spot for shooting lightning in a way that suits your style.
❂ Shutter Speed
Next, set the shutter speed. When it comes to lighting, long exposure is your best friend. So, use a long shutter speed (somewhere in the range of 15-30 seconds) to give your camera plenty of time to capture a lightning strike. This is essential, too, for capturing multiple strikes.
However, with longer exposures, you're letting in more light. So, you may need to adjust your aperture to get a properly exposed image. Play around with a few test shots and make adjustments.
⚡️ TIP: Play with bulb mode
Bulb mode is a fantastic tool for lightning photography. It allows you to keep the shutter open for an extended period, giving you complete control over the length of your exposure.
Switch your camera to bulb mode and use a remote shutter release to open the shutter, then release it to close.
While the shutter is open, the sensor is collecting light, so bulb mode is best used in very low-light situations – such as photographing lightning at night – or with a neutral density filter to prevent overexposure.
❂ Manual Focus
Manual focusing is your secret weapon for ensuring clear, sharp images.
By setting your focus to manual and adjusting it to infinity, you'll ensure that everything in your scene, from the nearby objects to the distant lightning bolts, is in clear focus. This will result in beautifully detailed captures of each lightning strike, capturing a storm's raw power and intricate beauty in all its electrifying glory.
❂ RAW Format
Finally, make sure you're shooting in RAW format. This gives you the most flexibility when it's time to edit your images.
When you shoot in RAW, you're capturing all the data straight from the sensor without any in-camera processing. You're getting the full spectrum of color and light information, which JPEG or other compressed formats can't quite match.
Adjusting exposure, tweaking colors, or recovering shadow details… these become a breeze when you're working with RAW data. And the best part? You can do all these edits without losing any image quality.
Now you're ready to shoot lightning! But before you head out, let's cover some composition techniques.

Photo: John D Sirlin/Shutterstock
A bolt of lightning captured in its full magnificence with a direct strike. Achieving such detailed captures requires the right combination of gear, settings, and a fair share of patience.
Tips for great compositions for lightning photos
Mastering the technical aspects of lightning photography is just half the battle.
The other half is creating a compelling composition that draws your viewer into the electrifying drama of a storm.
Here are a few tips to help you ‘strike' the right balance in your compositions:
Framing the Fury: Consider Your Surroundings
When shooting lightning, don't just focus on the sky – your surroundings can provide a dramatic frame for the storm. A lonely tree, a weather-beaten barn, or a city skyline can add context and interest to your image.
Rule of Thirds: Balancing the Bolt
When composing your shot, consider using the Rule of Thirds.
Imagine your image is divided into nine equal parts by two equally spaced horizontal lines and two equally spaced vertical lines.
Place the most important elements along these lines or at the points where they intersect. This helps to balance your image and naturally draw the viewers' eyes to the storm. And with luck, your lightning bolt will fire in the perfect third of the frame!
Leading Lines: Guiding the Gaze
Leading lines are a powerful compositional tool. Roads, fences, or rivers can all guide the viewer's eye into the image, leading them right to the spectacle of the lightning. Think of these like a red carpet rolled out for the lightning's grand entrance!
Depth: Adding Drama
By including objects at various distances from the camera – something in the foreground, the middle ground, and the background – you can add depth and drama to your images.
This gives your lightning shots a three-dimensional feel and pulls the viewer into the scene.
Negative Space: Let the Lightning Shine
Sometimes, less is more. Leaving plenty of empty space around the lightning can emphasize its grandeur and isolation. You don't want your image to be as busy as a rush-hour traffic jam – give the lightning some space to breathe!
The best compositions often break all the rules, so feel free to experiment.
As a budding storm chaser, you're now all set to capture the breathtaking beauty of lightning. Armed with these tips and techniques, you're not just chasing storms; you're chasing the perfect shot.
But as you head out with your camera toward a stormy horizon, remember the sage words of Benjamin Franklin: “Some are weather-wise, some are otherwise.” So, mind the safety tips, too!
Happy storm chasing, and here's to capturing that one-in-a-million bolt!
Recommended: Ready for more weather-centric photography tips? Check out our guide How to Photograph Storms: Tips for Beginners.


")