Read Time: 10 minutes
Ready to take your butterfly photos from “oh, cool” to “oh, WOW!”?
Whether you’re just starting out or you’ve been crafting butterfly photos for years, we’ve got some sweet tips to help you step up your game.
No fluff, just the good stuff – let’s dive into making those butterfly pics pop!

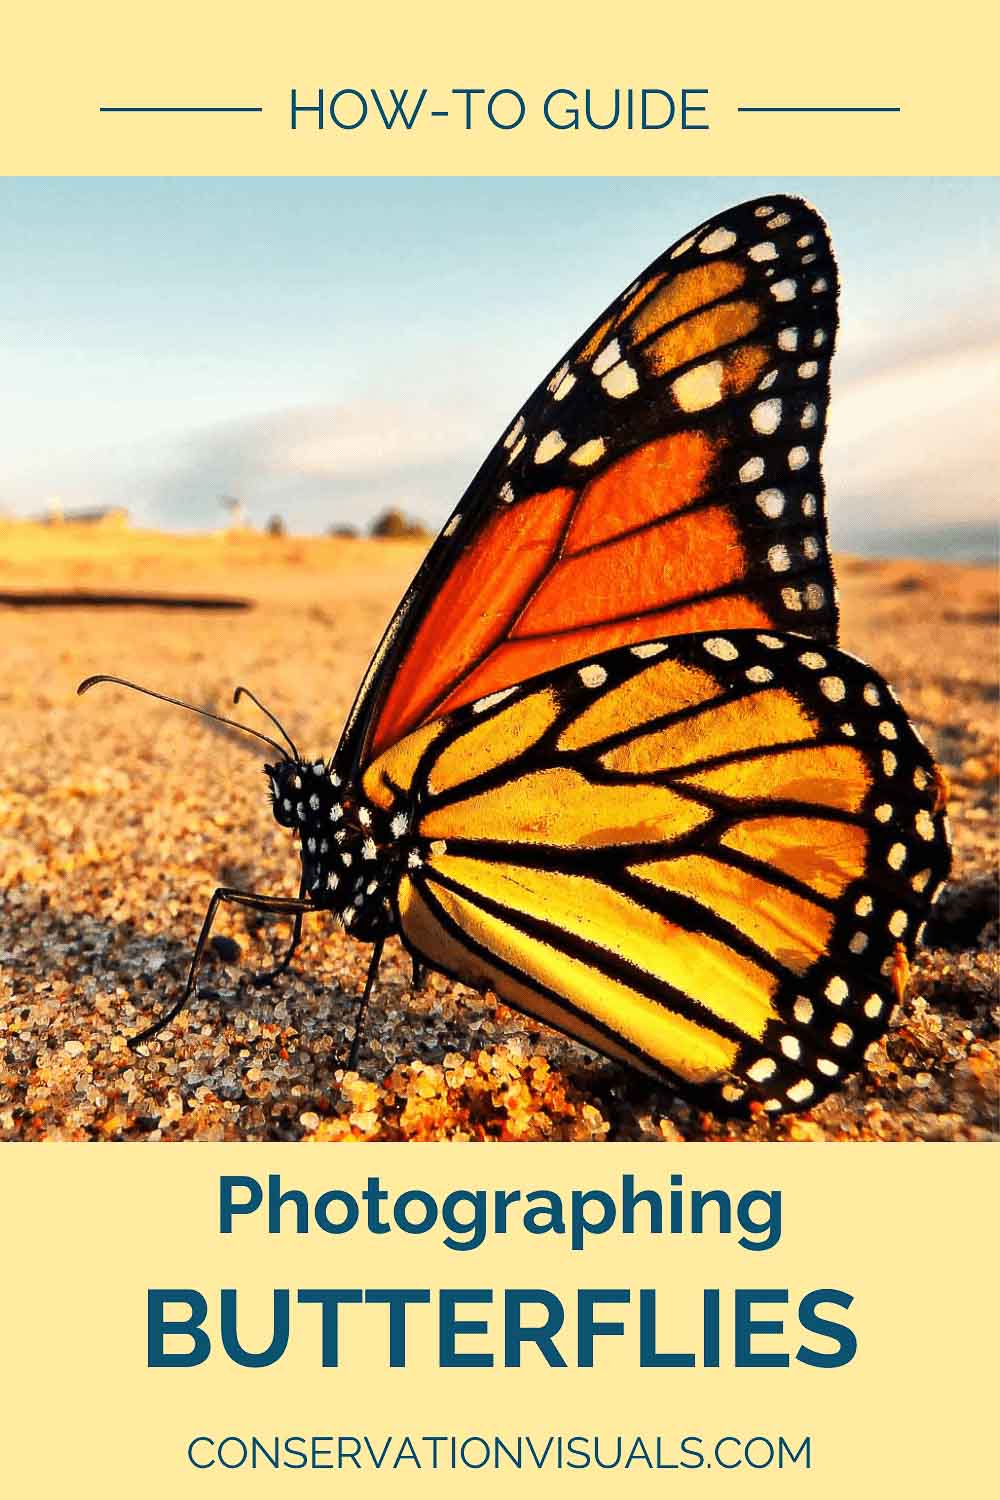
Photo: on_france/Shutterstock
Photograph butterflies on calm, sunny days when they are most active.
Discovering the Best Spots for Butterfly Photography
One of the first steps to crafting beautiful butterfly photography is finding the right location. Knowing where they like to hang out boosts your chances of catching them in all their glory.
Ever wandered through a butterfly exhibit or strolled around a botanical garden? These spots are buzzing with different butterfly species and are prime real estate for photographers eager to snap that magical shot.
However, the quest for photographing butterflies doesn’t end in controlled environments.
Wilderness preserves and prairie areas serve as natural butterfly hotspots, especially during the warmer months. Look for wildflower meadows, sunny forest clearings, and riverbanks. Butterflies love open, sunny spots where they can bask in the sun.
You can also curate your yard to be a butterfly haven by planting specific flowers and plants native to your area that attract them, ensuring your garden is not only a hub of vibrant activity but also an ecosystem-friendly space.
Head to a local garden center for help on choosing the perfect native plant species that’ll bring all the butterflies to your yard. Some great choices include milkweed, coneflowers, and butterfly bushes.

Photo: thsulemani/Shutterstock
Get close and fill the frame with the butterfly to emphasize its intricate details.
10 Tips for Crafting the Perfect Composition in Butterfly Photos
Once you’ve pinpointed those perfect spots for butterfly photography, it’s time to focus on composition. How you position your butterfly within the frame can turn a basic snapshot into a compelling story, making each photo session one to remember.
1. Shooting-Through Technique
Use leaves or flowers in the foreground to create a dreamy, blurred effect around the butterfly. This adds a layer of enchantment to your images. Try crouching down low and shooting through grass or flowers to create a natural frame around your subject.
2. Camera Positioning
Keep the camera’s back parallel to the butterfly’s plane of focus to achieve a shallow depth of field. This helps make your butterfly stand out sharply against a soft background. This technique works wonders when you’re using a macro lens.
3. Clean Background
Always check what’s behind your butterfly. A clutter-free background ensures that nothing distracts from the star of your shot. Try to position yourself so that the background is far away from your subject, which helps create a pleasing bokeh effect.
4. Eye-Level Shots
Get down to the butterfly’s level. Eye-level perspectives can make your photo feel more intimate and personal, bringing out the character of the butterfly. This can mean kneeling or lying on the ground, so bring a mat or kneepads for comfort.
5. Unique Angles
Don’t be afraid to play around with different camera angles. Unusual perspectives can turn a standard shot into an intriguing story. Try shooting from directly above, or getting a side profile of the butterfly.
6. Play with Light
Take advantage of natural light, especially during the golden hours. The soft lighting can enhance the colors and details of the butterfly’s wings. Position the sun behind you to avoid shadows on the butterfly and ensure even lighting.
7. Use of Color
Incorporate colorful flowers or greenery that complement or contrast with the butterfly. This can make your composition more vibrant and eye-catching. For instance, a bright orange butterfly on a purple flower creates a striking contrast.
8. Reflections and Shadows
Use water bodies or reflective surfaces to capture interesting reflections or shadows of the butterfly. This adds a creative twist to your shots. Try photographing butterflies near puddles or dew-covered leaves.
9. Rule of Thirds
Position the butterfly along the intersections or along the lines of the rule of thirds grid. This compositional rule can help balance your photo and draw the viewer’s eye. Place the butterfly off-center to create a more dynamic image.
10. Motion Blur
Experiment with slow shutter speeds to capture the fluttering of wings in a blur. This technique can convey the delicacy and motion of the butterfly, adding a dynamic element to your photo. Start with a shutter speed of 1/30th of a second and adjust as needed.

Photo: Ilyas Al Aziz/Shutterstock
Use diffused light on overcast days to avoid harsh shadows and highlight butterfly colors.
Selecting the Ideal Camera Gear for Capturing Butterflies
The choice of camera lens seriously influences the quality of your butterfly photographs. Here’s what should we consider when choosing the ideal camera and lens for capturing these fluttery beauties:
Quick Tips on Choosing the Right Macro Lens
- Go for 1:1 Magnification: This ratio allows you to capture the butterfly in its true size on your sensor, providing exceptional detail without any distortion.
- Opt for 100mm Focal Length or More: Longer focal lengths allow you to keep a comfortable distance, so you don’t spook the butterfly while capturing close-up details.
- Seek Out Image Stabilization: This feature is crucial for shooting sharp images handheld, especially when you’re trying to capture the delicate details of a butterfly in natural settings.
- Consider Extension Tubes: If a macro lens is out of reach budget-wise, extension tubes are a fantastic, cost-effective alternative that can help you get closer to those life-size shots.
Benefits of Using a Telephoto Lens
- Choose Long Focal Lengths (70-400mm): These lenses are perfect for photographing butterflies without getting too close, thus minimizing the chance of disturbing them.
- Enjoy the Background Blur: Telephoto lenses help achieve a beautiful, smooth background blur, making your butterfly the clear star of the show.
- Capture Details from a Distance: Keep your presence unnoticed and your butterflies behaving naturally by shooting from farther away.

Photo: Rabbitti/Shutterstock
Use colorful backgrounds to make your butterfly pop and create eye-catching compositions.
The Art of Focus: Achieving Sharp Butterfly Images
Getting sharp images is the name of the game in butterfly photography. But it’s not easy with all that fluttery movement that can sometimes be unpredictable. Here are some tips to help you capture sharp, well-focused butterflies:
Master Manual Focus
Auto focus is cool, but for absolute precision, switch to manual. This lets you fine-tune your focus, ensuring the butterfly’s eyes, body, and wings are tack sharp. Practice using the focus ring on your lens to get comfortable with manual adjustments.
Opt for a Narrow Aperture
Starting from f/8 and going higher narrows your aperture, which expands your depth of field. This means more of your butterfly stays in focus, from antenna to wingtip. Be mindful of the light levels, as a smaller aperture means less light hitting the sensor.
Crank Up Your Shutter Speed
Butterflies can zip from flower to flower pretty fast – even those that seem to flit slowly are surprisingly fast when you’re behind a lens. To freeze their motion and avoid any frustrating blur, set your shutter speed to at least 1/500th of a second. If they’re
really flitting about, don’t hesitate to push it even faster.
Stabilize Your Shot
Even the slightest camera shake can turn a great shot into a blurry one. Use a tripod when possible, or steady your arms against something solid when shooting handheld. Consider using a remote shutter release to avoid any camera movement when pressing the shutter button.

Photo: Cornel Constantin/Shutterstock
Use a macro lens to capture the mesmerizing details and textures of butterfly wings, revealing patterns that are invisible to the naked eye.
Lighting Techniques for Vivid Butterfly Photographs
Lighting is key to capturing those eye-catching butterfly photos. Soft, diffuse light on overcast days really brings out the stunning colors and details in butterfly wings, without casting any harsh shadows. And when it’s sunny? Positioning the sun behind you to front-light the butterfly can make those details pop, adding incredible depth to your shots.
But what if the lighting isn’t ideal? Here are some tips to improve the lighting for your butterfly photography:
Use a Diffuser
Utilize a diffuser to soften the intensity of light. It helps reduce those harsh shadows and gives your butterfly a more flattering glow. You can buy a diffuser or use something as simple as a white umbrella or a piece of translucent fabric.
Try a Ring Flash or Twin Macro Flash
These tools provide consistent, direct light, illuminating your subject evenly and enhancing the rich colors of the butterfly’s wings. They are especially useful in low light conditions or when you need to control the light direction precisely.
Adjust Your ISO
In case of underexposed backgrounds while using flash, increase ISO sensitivity or photograph butterflies under direct sunlight conditions for better results. Be cautious with high ISO settings to avoid introducing noise to your images.

Photo: Chongsiri Chaitongngam/Shutterstock
Use post-processing tools to enhance colors and sharpness, bringing out the best in your butterfly photos.
Stability in Butterfly Photography: Tripods and Handheld Techniques
Stability is super important in butterfly photography, and getting it right means sharper, clearer images. You can achieve this stability by using tripods or opting for handheld shooting, depending on your needs.
Tripods: Your Best Friend for Sharp Shots
Tripods are fantastic for securing your camera in place, ensuring your shots are free from unwanted movement. This is especially valuable when you’re shooting with long exposures or waiting for the perfect moment to capture a butterfly resting. With a tripod, you can also:
- Pre-focus and compose your shot with precision, allowing you to anticipate where a butterfly might land or pause.
- Reduce the physical strain of holding a heavy camera setup, which is a lifesaver during longer photography sessions.
Monopods: The Mobile Middle-Ground
Monopods offer a sweet balance between stability and mobility. They might not provide the same level of steadiness as tripods, but they’re a great choice if you’re moving around a lot and don’t want to miss a shot because you’re setting up. Here’s why monopods rock:
- Faster movement and repositioning compared to tripods, which is perfect for following butterflies as they flutter from flower to flower.
- Less fatigue than holding your camera by hand, keeping your shots steady even when you’re on the move for hours.
Handheld: For the Butterfly Chaser
When you shoot handheld, you’re free to move as quickly as the butterflies do. This method lets you react instantly to the unpredictable antics of your fluttery subjects. To maximize your success while shooting handheld:
- Use image stabilization features available in many modern lenses and cameras to help reduce blur.
- Opt for a lightweight setup like a macro lens with a macro flash, or a telephoto lens equipped with a speed light, which allows for quick, agile shooting.
- Increase your shutter speed to freeze fast movements, ensuring your butterflies appear crisp and clear in every shot.
Each of these techniques has its place in butterfly photography. By understanding when to use tripods, monopods, and handheld shooting, you’ll be well-prepared to capture beautiful butterfly images in any situation.

Photo: NEOS1AM/Shutterstock
Be calm, move slowly, and you’ll get to witness cool natural behaviors that few people ever get to see.
Post-Processing to Elevate Your Butterfly Photography
Post-processing is where your butterfly photography really takes flight. It’s your chance to fine-tune your images and highlight the breathtaking details of your subjects. Here are a few tips to try when you’re working your images on the computer:
Adjust Brightness and Contrast
Enhance the visibility and pop of your photo. Slide your brightness to enhance overall image illumination without washing out. Adjust your contrast to deepen the distinction between the colors and elements of your photo, making details crisper.
Sharpen Your Images
Bring out the intricate details of butterfly wings and features. Use the sharpening tool sparingly. Too much can make the photo look grainy. Aim for just enough to make details like the edges of the wings and eyes come to life.
Effective Cropping
Strengthen the composition and focus on the butterfly. Crop to remove distracting elements from the edges of your frame or to bring the butterfly more into focus as the central subject. Follow the rule of thirds to position your butterfly dynamically within the frame.
Enhance Vibrance and Saturation
Make your butterfly’s colors true to life and visually striking. Increase vibrance to enhance weaker colors without affecting skin tones and already saturated colors. Adjust saturation for a boost in color intensity but be cautious—over-saturation can make your image look unnatural.
Apply Subtle Gradient Filters
Enhance the lighting and mood of your image subtly without overwhelming the natural beauty of the butterfly. Use gradient filters to gently adjust the exposure and color balance in specific areas of your photo.
You can darken overly bright skies or lighten shadowed areas, ensuring that the butterfly remains the star of the show.
This technique is particularly useful for creating a focal point or adding a soft touch of drama to your background, enhancing the overall atmosphere of the image while keeping changes understated and natural.

Photo: Chris Frost/Shutterstock
Experiment with wide-angle shots to include more of the butterfly’s natural habitat.
Ethical Practices in Butterfly Photography
Butterfly photography isn’t just about capturing images you’re excited to share on social. It’s also about connecting with these beautiful creatures and telling their stories with respect and care. As photographers, we have a responsibility to practice ethical photography. This means respecting nature and causing minimal impact on the environment, especially when photographing rare and endangered species.
Avoid Disruption
Always observe butterflies from a distance that does not alter their natural behavior. Use a long lens to capture close-up shots without needing to get too close. If you’re going for a more wide-angle macro approach that requires you to get closer, be sure to move in a way that doesn’t disrupt their feeding or other behaviors.
Plant Native Flora
Encourage butterflies to visit your area naturally by planting native plants and flowers. This not only provides them with natural habitats and food sources but also enhances your photography opportunities without disruption.
Do Not Capture
Never catch butterflies to photograph them. Capturing and handling butterflies can cause them stress and physical harm.
Be Mindful of Your Movements
Move slowly and deliberately around butterflies. Quick movements can startle them, leading to stress and disruption of their natural activities.
Promote Conservation Through Your Art
When displaying or selling your photographs, include information about the species and the importance of conservation. This raises awareness and promotes a broader impact through your work.
Final Thoughts
As we finish up our dive into butterfly photography, let’s remember this hobby offers much more than the chance to snap stunning shots—it’s a way to truly connect with nature and make a positive impact on the lives of these enchanting creatures.
Each time you set up your camera, think beyond your settings like aperture and composition, and consider how gently you tread in their delicate world.
By following ethical practices, planting native plants, and respecting the natural ways of butterflies, you do more than just improve your photos—you help these crucial pollinators thrive.
Whether you’re just starting out or you’ve been behind the lens for years, infusing these thoughtful practices into your photography can transform it into a meaningful pursuit of artistry and advocacy, ensuring that these beautiful creatures continue to brighten our natural landscapes for years to come.

Photo: Miguel Prs/Shutterstock
Try different angles, like shooting from above or below, to add variety to your butterfly photos.

Photo: shardar tarikul islam/Shutterstock
Switch to manual focus for precise control when capturing the intricate details of a butterfly’s wings, antennae, and body, ensuring every tiny element is crystal clear.